Bulbs & Perennial Roots
What will my order look like?
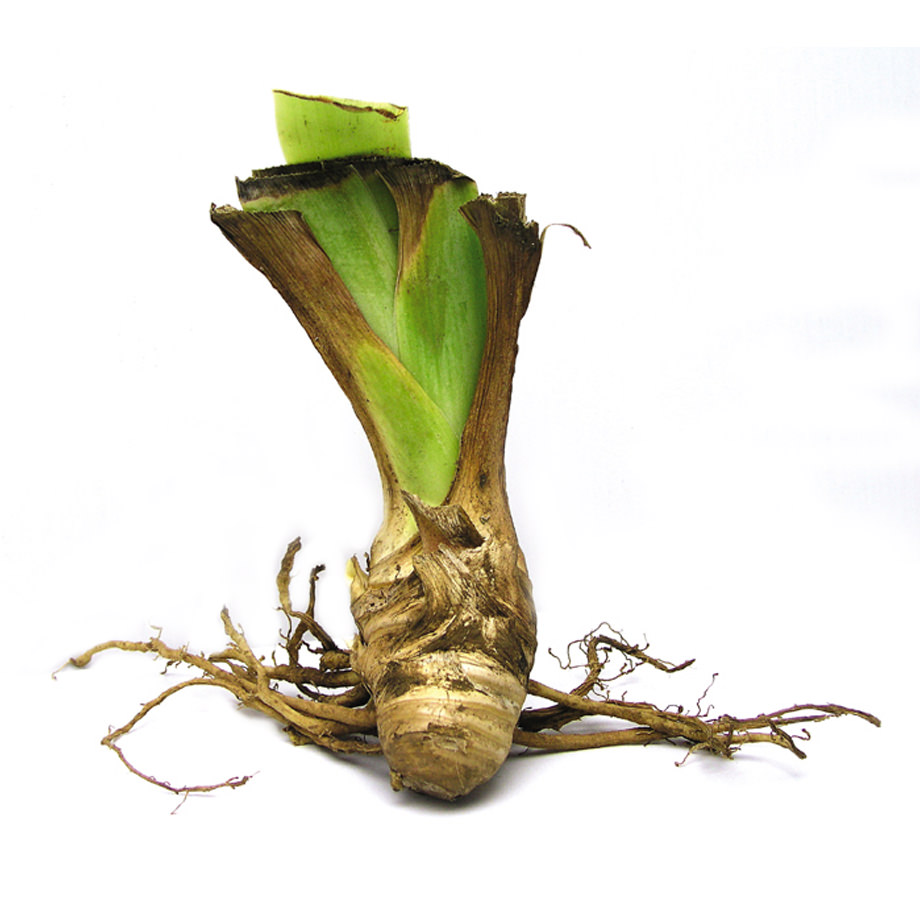
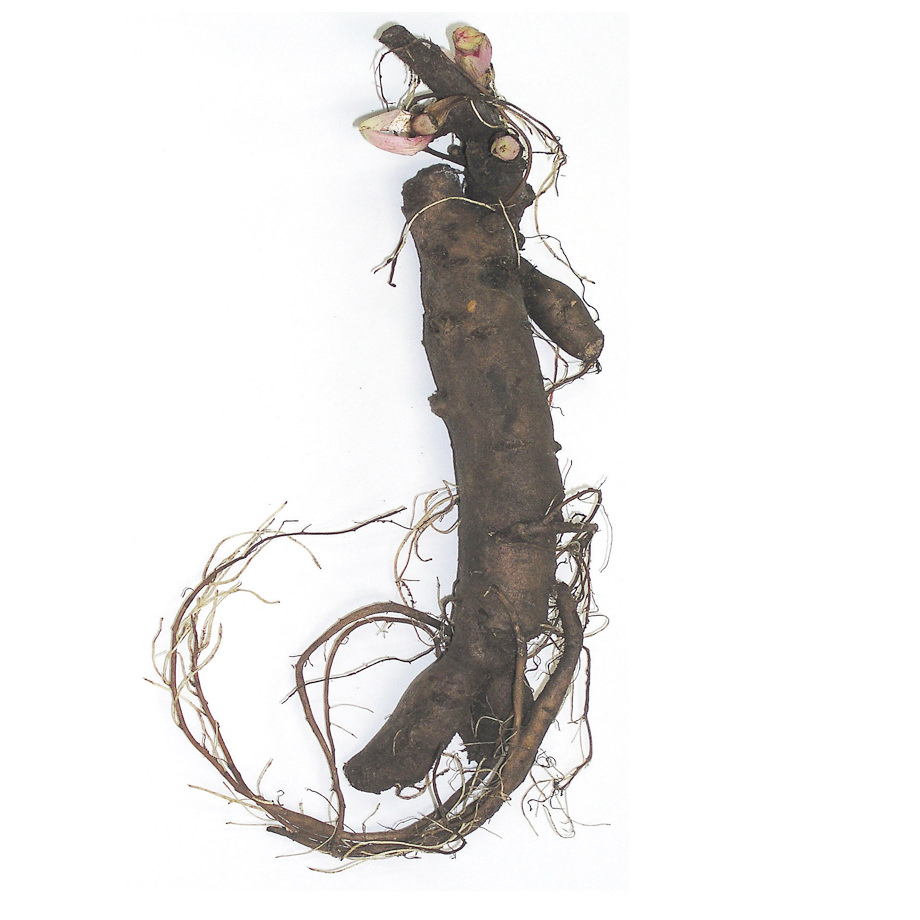
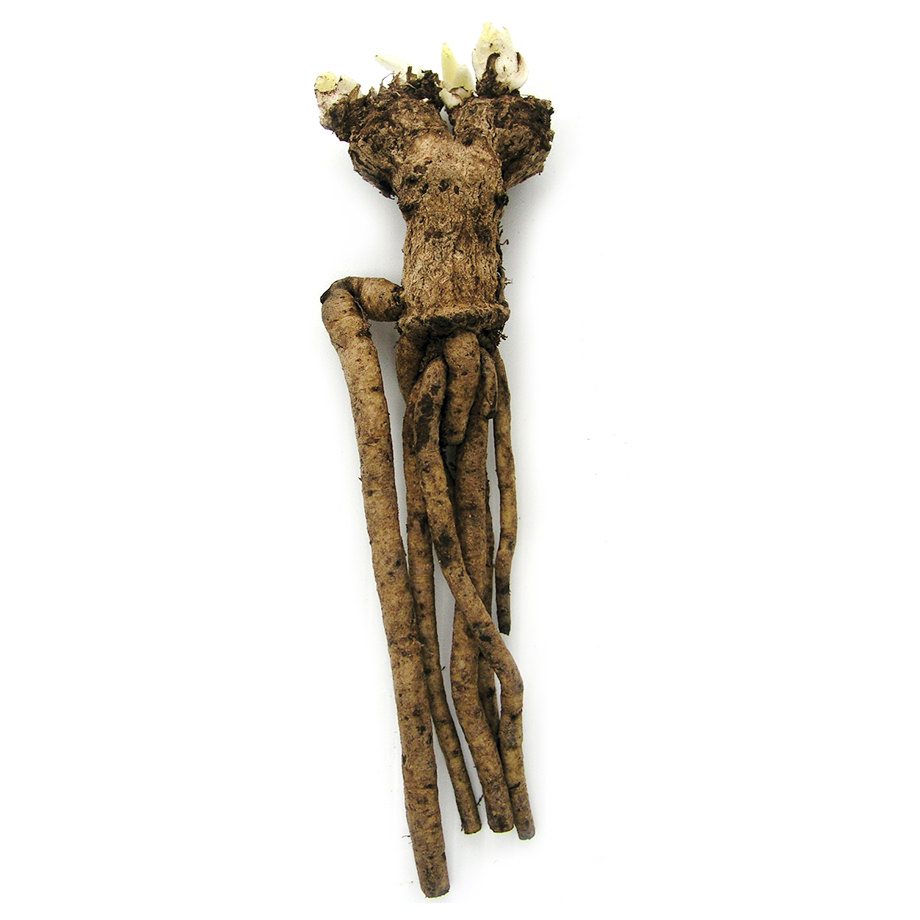
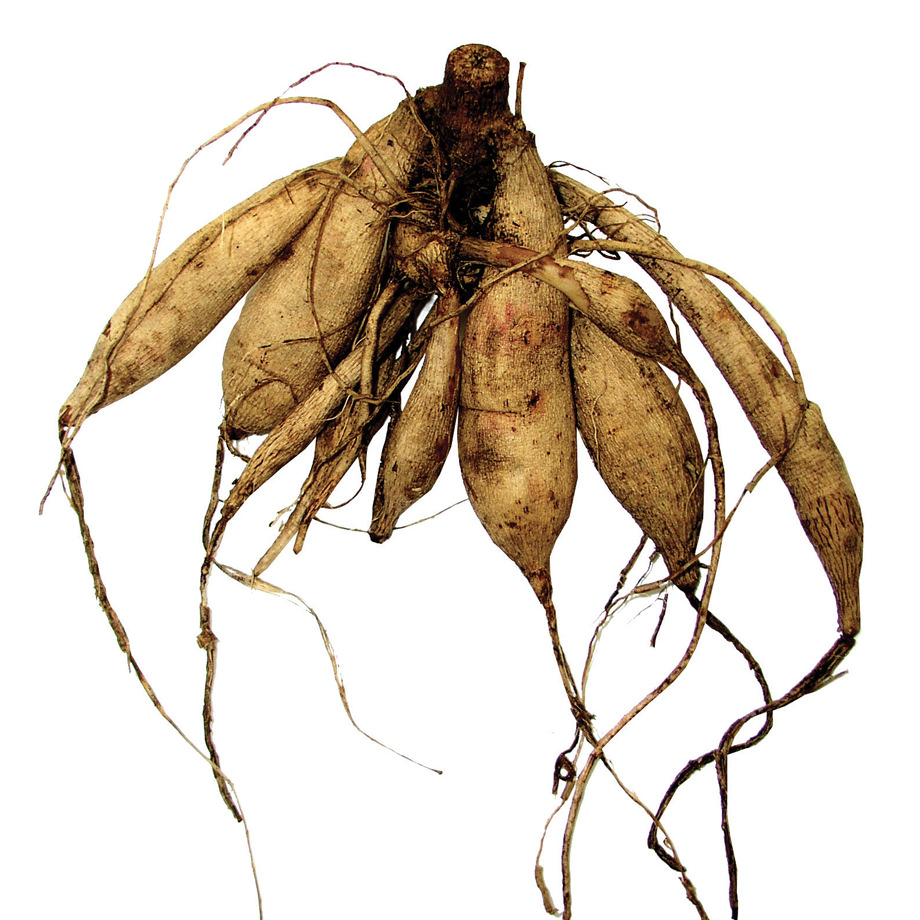
We're all quite familiar with the lovely catalogue photos and online images that show our favourite plants in bloom. Before they get to that stage they have to be harvested, processed, stored, packaged and then shipped for you to plant in your garden. Sometimes gardeners are surprised by what they find when their order arrives. Please continue to refer to this useful description of what to expect as well as proper planting instructions to result in your plants looking just like they do in the pictures when you first choose them.
Bare Roots
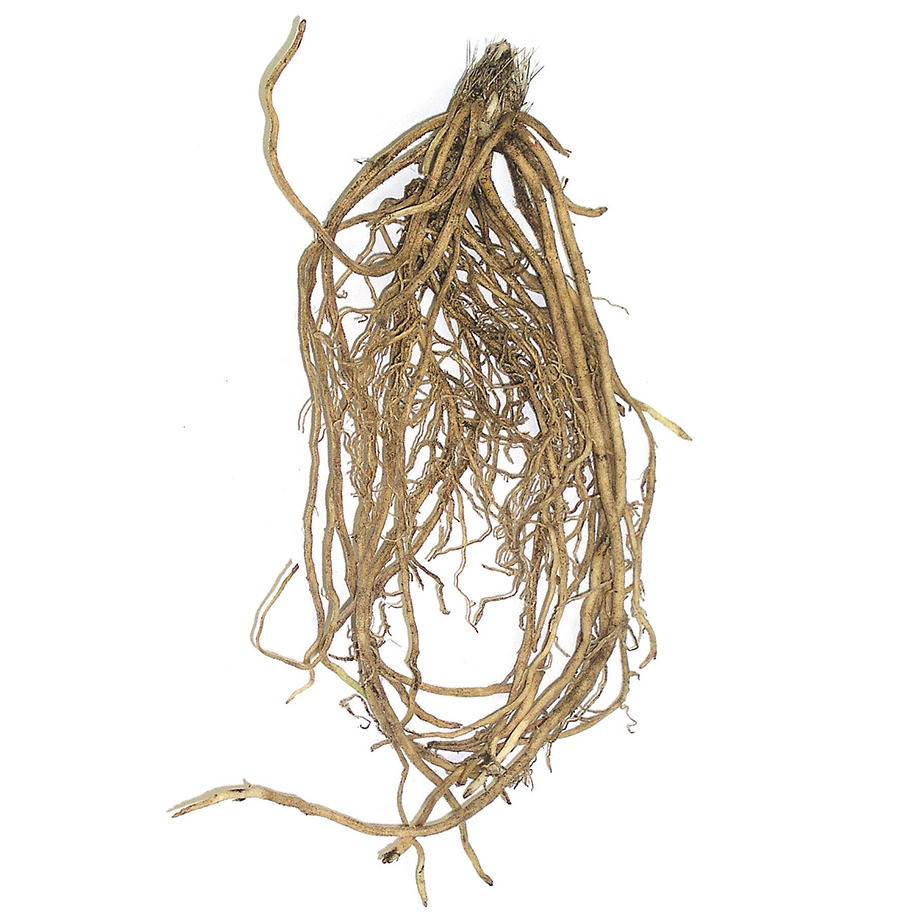
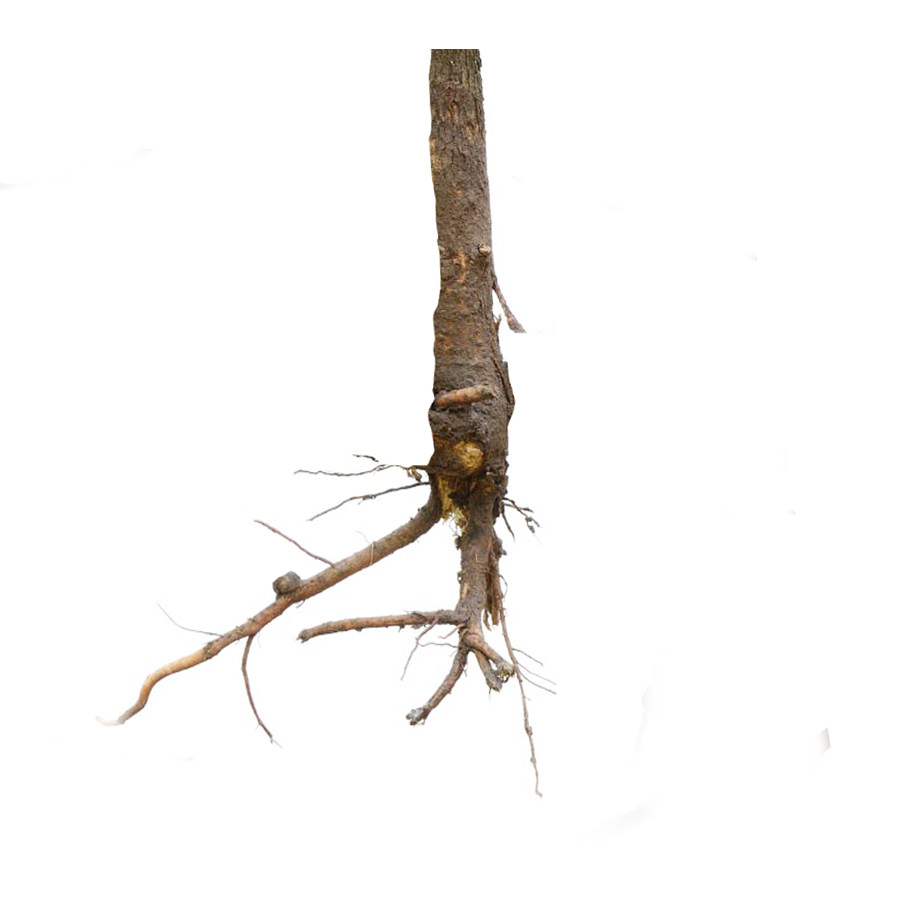
We describe some perennial items as ‘Bare Root’. This simply means plants are dormant and have exposed roots rather than formed in soil. Bare roots should be planted as soon as possible either in the ground or a pot, keeping the roots moist at all times. Roses, fruit trees, shrubs and several perennials come in bare root form and grow successfully.
Roots with Eyes
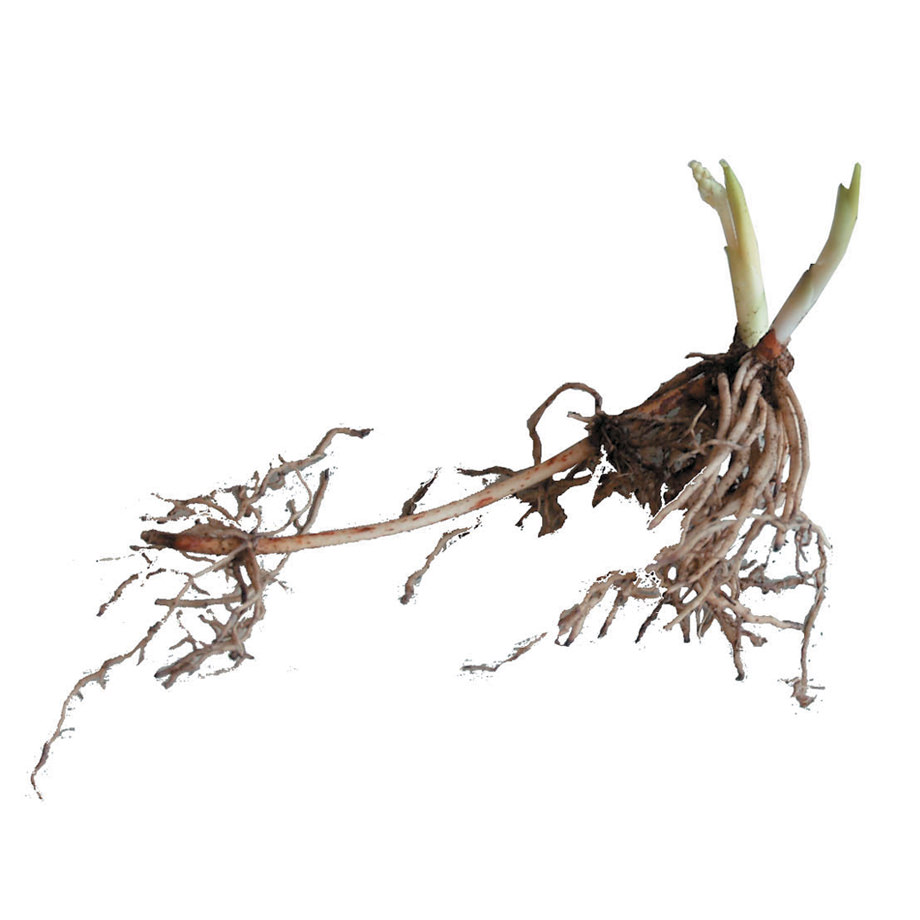
A form of rhizome where the size of the plant grade is determined by the number of eyes or buds. Eyes refer to the point of growth on a plant root. Depending on the plant, 1-2 or 2-3 eye plant roots are the highest grade and are blooming size. Peonies, Astilbes and Hosta have 'eyes'.
Note:
For specific variety growing instructions please go to the specific product page on our site and scroll down to the Growing Instructions section. See example here: Lily Mix
Perennial Roots
Dormant Bare Roots
We usually ship perennials to you in their dormant state, that is: bare roots, usually without leaves, in bags of loose peat moss. They may have some shoots beginning to grow. It is very important to plant these dormant perennials as soon as possible after you receive them. If it is absolutely necessary to store them for a short time before planting them, open the cartons and any plastic that is around the roots. If the roots appear dry, soak them for a few hours in warm water. Thereafter store in slightly moist peat moss in a cold, but not freezing location until you can plant. They can also be placed in pots of soil if planting will be delayed for more than 2 weeks. Use any packaged, peat-based potting soil and pots with drainage holes.
Non-Dormant Plants in Pots
Some Perennials will be shipped to you from our greenhouses. They will be in pots and may have actively growing green leaves. These pots should be immersed in water upon arrival to thoroughly soak the root ball. These growing plants must be hardened off before planting outside. Keep in a cool bright room, and place outside on mild days and gradually leave outside for longer periods of time. After a week or so, or when nighttime temperatures are above freezing, plant outside. If a severe dip in temperature is expected, you may want to place straw or an old blanket over the green leaves to protect them from severe damage. Frost or cold will not permanently hurt the plant, but it may damage the new leaves and set growth back.
Bulbs for Spring Planting
Plant bulbs as soon as possible, once you have received your shipment. Refer to the variety product page under the Growing Information tab for individual planting tips per bulb type. If you cannot plant the bulbs as soon as they have been shipped to you, remove the bulbs from plastic bags and put them on trays with damp peat moss or sawdust in a cool, well-ventilated place until you have a chance to plant them. Do not let the bulbs freeze. Plant outdoors once the conditions are right for your hardiness zone.
Bulbs for Fall Planting
Plant the bulbs as soon as possible once you have received them. Refer to the variety product page under the Growing Information tab for individual planting tips per bulb type. If you cannot plant the bulbs as soon as they have been shipped to you, remove the bulbs from plastic bags and put them on trays with damp peat moss or sawdust in a cool, well-ventilated place until you have a chance to plant them. Do not store them at temperatures below 4°C. Generally all bulbs planted in the fall are hardy and do not need any special protection unless specified.
General Planting Information
Where to Plant
The most important rule when planting bulbs is to choose an area that is well-drained. Most bulbs will rot or deteriorate quickly where soil is constantly damp. Most bulbs thrive in full sun, or at least 5-6 sunny hours daily. Some bulbs such as fritillaria and wood hyacinths prefer filtered shade. Within each individual bulb or perennial variety it is stated what type of light conditions are preferred.
Soil Drainage
Most Bulbs, Perennials and many other garden plants require 'well-drained' soil in order to thrive. Areas that often have 'sitting' water or constantly soggy soil can quickly cause roots to rot and deteriorate, especially over winter.
Testing for Drainage
Dig a hole 1-foot wide. Fill the hole completely with water and record how long it takes for the water to completely drain. The ideal time is between 10 and 30 minutes. If it drains in less than 10 minutes, the soil is drought-prone and most suitable for plants that need dry or very well drained soil. If it takes 3 to 4 hours, your soil is poorly drained, due either to a large percentage of clay or due to compaction or an impermeable layer of minerals below the surface that blocks water movement.
Improving Soil Dranage
Any soil can be improved by working in ample amounts of organic matter, such as well-rotted manure, compost or peat moss. Thoroughly till or double dig the area to a depth of 10-12 inches. If your soil drains too quickly, organic matter will help it hold moisture. If your soil is poorly drained, organic matter will improve the texture. Very poorly drained areas may need to have drainage tile installed or you may need to garden in raised beds. Raising the soil level by just a few inches greatly improves drainage.
Planting Bulbs
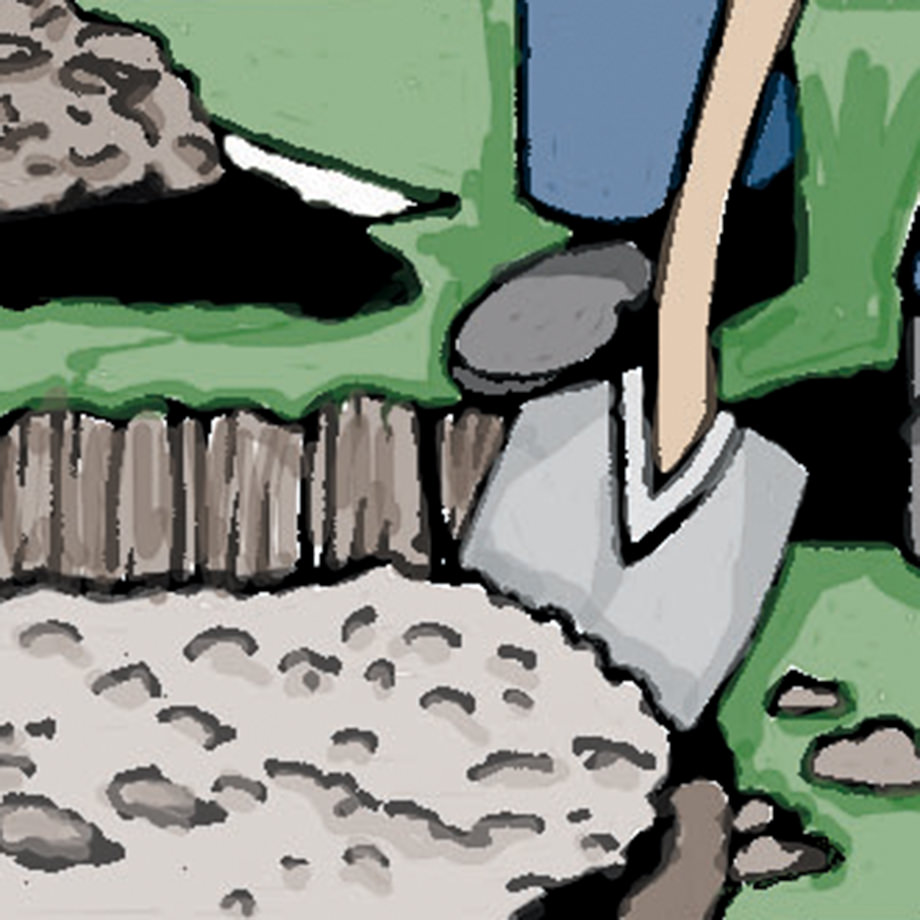
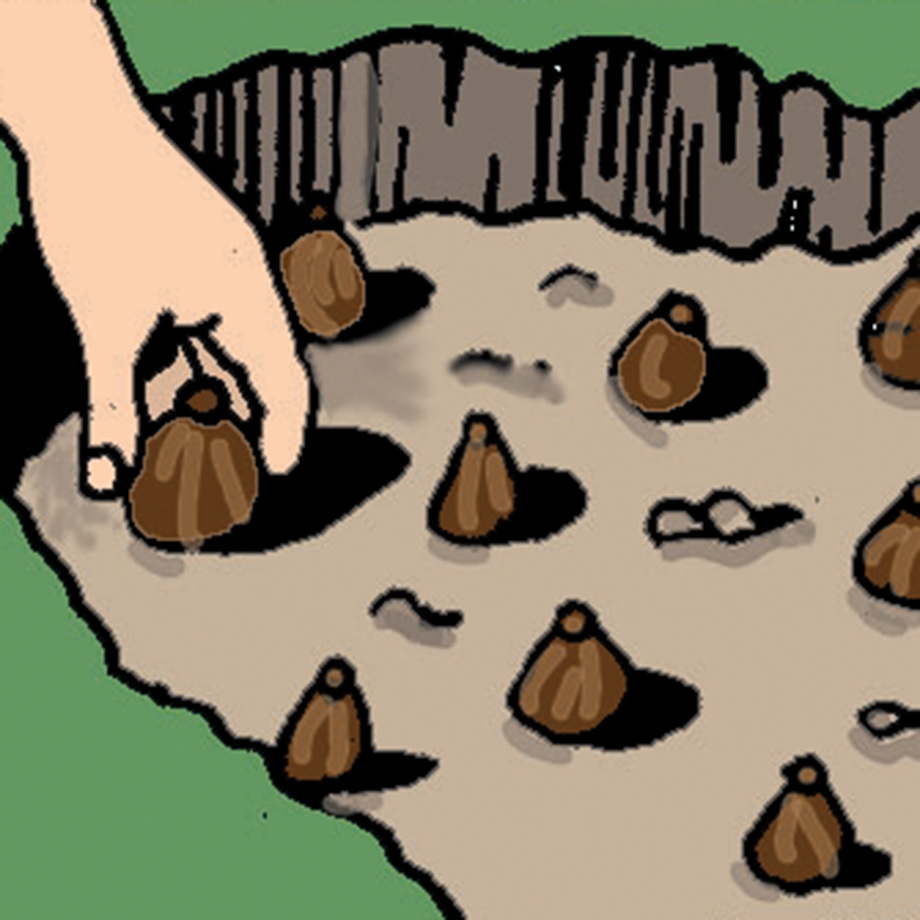
Plant bulbs individually by digging a hole for each bulb with a trowel or bulb planter, or place several bulbs on the bottom surface of a larger hole, then cover with soil. As planting depths and spacing varies depending on the type of bulb, refer to the cultural information found on each product page under the Growing Information tab. (You can also download the full Growing Guide online here.)
Whichever method you use, be sure to loosen the soil at the bottom of the hole and work in a handful of organic fertilizer such as Veseys Bulb Fertilizer. Then press each bulb firmly into the soil, top pointing up and fill in the hole. When in doubt as to which way is up on a bulb, plant it on its side and let 'Mother Nature' decide! After planting, water the area well to settle the soil and to start the roots growing. If rainfall is sparse, you may need to water the bulbs once a week to help them get established.
For strongest visual impact, we suggest planting your bulbs closely in groups, drifts or clumps of a single kind and colour. With small bulbs like squill, snow crocus or grape hyacinths, it is essential to plant them in generous drifts if they are to be noticed. When planting bulbs, be sure to take colour into consideration. In general, groups of a single colour have the most impact.
Planting Perennial Roots
It is a good idea to soak any bare-root perennials in water for a few hours, but not more then a day, before planting. Add organic matter to the area and provide good drainage unless the plant variety enjoys wet roots. Unless otherwise specified, bare-root perennials are usually planted with the crown (where the shoots meet the roots) an inch below the soil surface. Firm soil gently to eliminate air pockets and water in well. Mark the area clearly since it may be awhile before the plant shows itself. Perennials that come to you in pots should be watered well before planting also. Loosen and tight roots and plant at the same depth as the plant was in the pot. If the leaves are green and growing, you should protect them from frosts with mulch, reemay or any blanket. If white or pale yellow shoots have started to develop, protect them from wind and harsh sun until they green up. You can use any of the methods for protection as mentioned. Pay particular attention to watering any new plants during the first season. Once established plants generally have some drought tolerance and will only need to be watered if the season is hot and dry.
Naturalizing
Naturalizing bulbs is a popular planting technique to achieve a natural effect in the landscape—as if nature had planted them. You can naturalize bulbs in a meadow or woodland, in areas under deciduous trees and shrubs, at the edges of paths and walkways, or in a lawn. The traditional method of naturalizing is to scatter the bulbs across the area and plant them where they fall. Or you can simply plant the bulbs at random, avoiding any resemblance to rows or patterns. In succeeding years, the bulbs will multiply and fill in the spaces.
Daffodils naturalize beautifully in an open area at the edge of woodlands, or on the slope of a lawn. Small bulbs like snow crocus, snowdrops and Siberian squill whose foliage matures fast are best for naturalizing in lawns, set out individually or in clusters.
Maintenance
Fertilizing & Watering
Once planted, bulbs are very easy to care for. Most bulbs will multiply and reward you with increased bloom in years to come. In subsequent years, work some 5-10-5 fertilizer into the soil around summer flowering bulbs several times during the growing season. Fall planted bulbs such as tulips and daffodils will respond well if you feed them every autumn with a slow-release fertilizer like Veseys Bulb Fertilizer. Work it into the soil surface and the nutrients will be released to the bulbs during the entire fall and spring growth cycle. Be sure to water well after these feedings to get the nutrients down to the bulb. You can also use a water soluble fertilizer directly on the foliage for a quick energy boost. If the season is rainy, give your bulbs an extra dose to compensate for leached-out nutrients. Indoor pot-grown bulbs do best if a houseplant fertilizer is applied weekly during active growth. Please Note: There is no benefit to fertilizing fall planted bulbs while they are flowering or after flowering. Excess nutrients at this time can in fact lead to fusarium bulb rot, which is the number one cause of bulb loss.
In dry conditions, give your bulbs adequate water. Water deeply enough to reach the roots. This is especially important after rapid growth begins. Compost or other organic material applied 2″-3″ deep as mulch around new shoots will help greatly to conserve moisture.
Important!
It is critical in caring for your bulbs to allow the foliage to mature naturally. The leaves are the bulbs’ principal source of energy for next year’s bloom and must mature for several weeks. When the foliage withers, you can cut it off at the base. Adequate moisture while the foliage is ripening is also important.
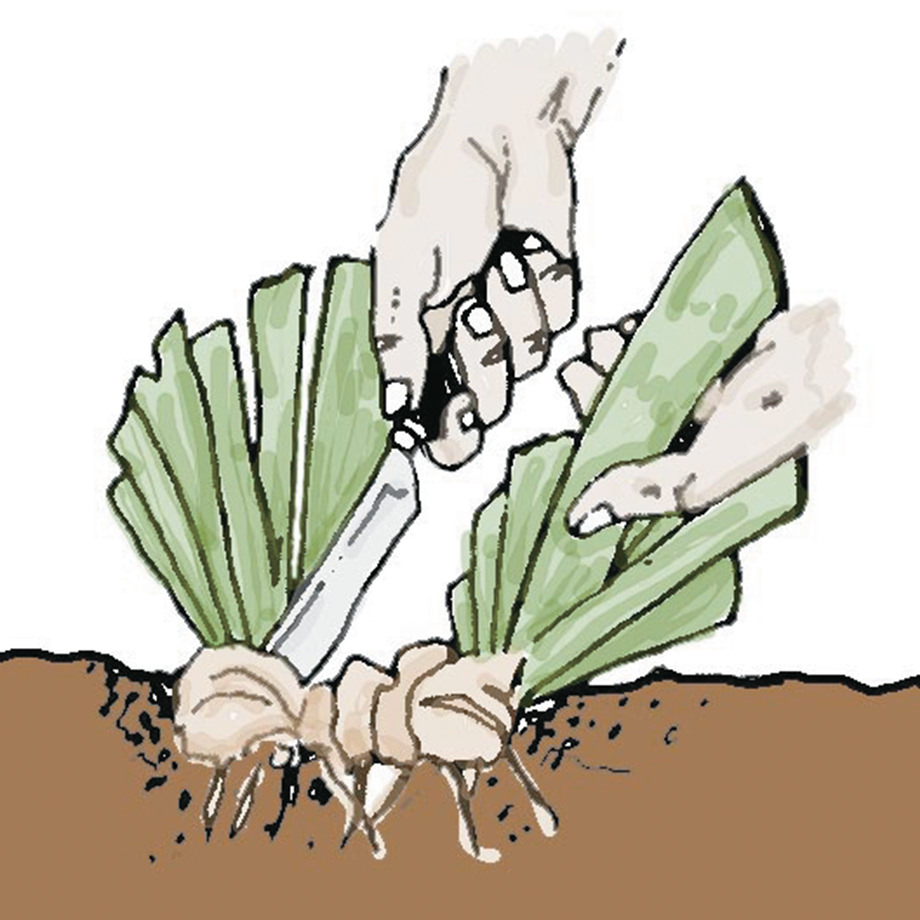
Dividing Bulbs
If, after several years, your bulbs have formed large clumps but blooms are sparse, they most likely have run out of space and are competing fiercely for the available light, water and nutrients. This is a sign that you should divide them, and is best done right after flowering. When the foliage is ripening, dig up the clump, break or cut it apart and replant where you want a good show. You may find smaller bulbets or tubers adhering to the parent bulb. These may be discarded or replanted where they can grow to blooming size in a couple of years.
Animal Pests
If wild animals like squirrels, chipmunks and mice are dining on or carrying off your bulbs, try the following:
- Put sharp gravel around the bulbs when you plant. Improves drainage and deters critters.
- Cover newly planted bulbs with very small wire mesh. Remove in spring.
- Interplant daffodils and frittilaria among your tulips and crocus. Squirrels avoid these types of bulbs due to the scent.
- Clean up bulb debris (Tunics, etc.) after you plant, so pests aren't attracted.
- Mothball flakes, human or pet hair, or pine needles sprinkled on the ground.
- Do not put winter mulch on your planting until after the ground has frozen in December or January. If you put it on earlier you are creating warm, winter nests for rodents looking for winter homes!
Common reasons why bulbs and perennials may not bloom
The overall cause of a bulb not growing or not producing a bloom, but many nice leaves, is either the bud was damaged or a flower bud wasn't formed. NO bud equals NO flower. Cultural conditions can also lead to diseases or conditions that cause the leaves to be deformed or the bulb to disappear. The following may lead to no flowers or no growth:
- Fertilizing & Watering: If bulbs have been fertilized or watered too much. Most bulbs prefer dry summers and a single application of bulb fertilizer in the fall. If your bulbs were planted near perennials, annuals or a lawn that you are constantly watering and fertilizing, they will not be happy.
- Sun: If there wasn't enough sun last spring or they are planted in a shady area. Most spring blooming bulbs prefer full sun for 6 hours per day.
- Competition: If they are in competition with other plants, such as shallow rooted trees and aggressive perennials they may be weakened.
- Poor drainage: If water puddles where they are planted, they will get basal rot fungus, not grow properly and die out. Bulbs need excellent drainage.
- Leaves Removed: If the leaves were cut off last season before they withered on their own. The leaves produce and store energy for next year's flowers. If they were removed too soon, the bulb cannot flower.
- Need Dividing: If they have multiplied and are crowded, you may just need to divide them. This is not normally a problem in a home garden setting, but if there are scads of crowded leaves, you can try division.
- Shallow Planting: They may be planted too shallow. They should be planted to a depth equal to at least three times the width of the bulb, up to 10″, but at least 3″ for small bulbs.
- Planted Too Early: You may have planted them too early last fall. If the bulb had rooted and the soil was still warm, it may have started to produce a flower bud. Once the flower bud emerges it will live or die depending on the current soil temperature. If it emerges when it is too cold, it dies and then next spring, no flower. Plant most fall bulbs after the soil has cooled. This is usually September in Zones 2 and 3, October in Zones 4 and 5, November in Zones 6-7 and December in Zones 8. Plant your daffodils in the early part of your fall (when leaves start to fall from the trees) to give them some extra time to root in.
- Animals Pests: Squirrels, mice, deer, rabbits or other pests may have eaten or damaged the bulbs.
- Winter Temperatures: If you had severe alternating temperatures during the winter, the bulbs may have been pushed out of the ground or started to grow during a mild spell and been damaged by subsequent very cold weather. A heavy winter mulch of straw, leaves or evergreen boughs helps prevent this.
- Immature Bulbs: In rare cases, if bulbs are immature or too small, they may not have a developed a flower bud and so cannot bloom. They may bloom the second year.
- Spring Temperatures: If temperatures fluctuate severely before bloom time, flower buds may be aborted.
Overwintering Bulbs and Perennial Roots
Hardy Plants
When we refer to hardy plants, these are the type of plants that can be left in the ground safely all year even in locations that experience heavy frost depths. The majority of the bulbs that bloom in the spring (bulbs that were planted in the fall) are in this category. More common types are Crocus, Daffodils, Tulips, and Hyacinths. Lilies and many perennials are also hardy in most zones but it is best to be sure you check each plant’s attribute which is listed in the catalogue as well as on our web. The lower the zone number, the colder the zone. For example, Zone 2 is colder than Zone 3. A plant that is hardy to Zone 3, may not overwinter in a Zone 2 garden, unless given special protection, so be sure you know your zone before you make your plant selection. You can add extra protection around your bulbs to be sure they can withstand the cold temperatures. Bulbs can benefit greatly from a 2″ to 4″ deep mulch of shredded bark or hardwood, compost or leaves. Mulch prevents the ground from alternately freezing and thawing, which can heave the bulbs out of the ground during winter making them more vulnerable to damage. Bulbs also benefit from mulch in the summer. A layer of mulch also conserves moisture and suppresses weeds which can be issues for these types of bulbs during months where temperatures are warm. If you do decide to mulch, it is best to wait until the ground freezes before applying a winter mulch to fall planted bulbs.
Tender Plants
Tender plants are bulbs or perennial roots that can not survive the cold temperatures in your area. In most Canadian zones, you must dig up bulbs like Begonias, Dahlias, and Gladioli before fall frost, and store these types indoors during the cooler months before being planted again in the spring. Storing them can be easily done; keep them in a dark place that is cool and dry but not below freezing. We also recommend that you surround them with peat, sawdust and keep them in a container that won’t build up moisture. Of course, in very warm climate zones, such as coastal B.C., they can be left in the garden year round. When brought indoors for the winter, storage temperatures may range from 7°C to 15°C depending on the type of bulb. Many gardeners treat them as annuals and replace them each season. If a bulb or perennial is borderline hardy in your area and you must provide protection by applying a thick layer of mulch.
Bulbs and Corms
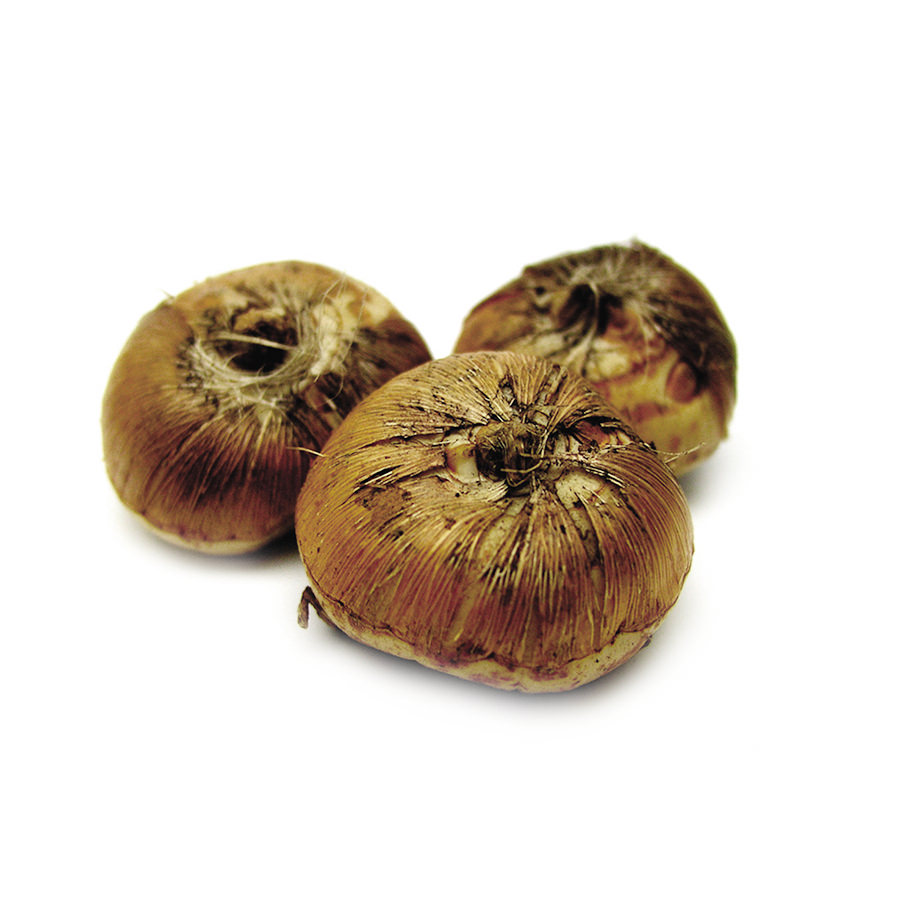
Bulbs and corms (ex: gladioli) that have a protective papery husk are easy to deal with. Simply dig up in the fall and shake the soil off. If the foliage has not quite died, leave the bulbs upright in a cool spot for a couple of weeks. Cut off the dead foliage and store the bulbs in a breathable type of material such as mesh onion bags, and place in a cool, frost-free area.
Summer blooming bulbs
Summer blooming bulbs that have fleshy tubers or roots (Ex: Dahlias) should be dug before frost and spread out in a shaded spot (like a garage) until the outside of the tuber feels dry. Lay them in uncovered shallow flats or boxes filled with peat moss, sawdust or vermiculite. Check monthly to make sure they are not drying out or shriveling. They should stay firm and plump until spring planting time. Over the course of the storing time, you may have to sprinkle them with a little water to prevent them from drying out. Be sure not to add too much water while they are being stored as this will cause mold.
Bulbs for Other Uses
Bulbs for Outdoor Containers
Many summer-blooming bulbs take beautifully to container-growing. To get a longer growing season, you can start many of them indoors early in spring and move them outdoors, pot and all, when temperatures are warm enough. Tuberous Begonias, Caladiums, Calla Lilies, Dwarf Cannas, and Dwarf Dahlias are a few of the best to try.
Whether potting bulbs for indoors or outdoors, make sure the pot has good drainage by placing gravel or broken pottery in the bottom of the pot. Position the bulbs at the recommended depth and water well once and then, water sparingly until top growth appears. After that, keep the soil moist and remember that clay pots dry out very quickly. In hot weather, water daily. Turn the pots a bit each day to keep stems straight.
Bulbs for Cutflowers
If you choose to grow some bulbs that are ideal as a cutflower you may want to try some summer bulbs particularly Dahlias, Callas, Lilies, Gladioli, as well as Anemone Coronaria. A separate bed, or a section of your vegetable garden, is often the best solution for growing large quantities of these bulbs. If proper drainage is a problem, you may want to make raised rows or in a separate raised bed. Follow the same recommendations for spacing and depth given within the individual growing instructions as you would for growing in a border.
Bulbs as Houseplants
Several of the summer bulbs do well as houseplants. Be sure to provide at least 4 to 6 hours of sun each day, adequate humidity, and, for some bulbs, temperatures that are cool enough. Over-watering your summer bulbs indoors is as comparable to as poor drainage outdoors. Let the surface become almost dry to the touch before re-watering. Caladium and Cyclamen are the exceptions; they need constant moisture. Use a porous soil mixture with coarse drainage material in the bottom when potting up. It is not recommended to use garden soil as it tends to be heavy and may not drain as well when placed in a container. Set the pots on trays of pebbles with water added to increase humidity or group plants together.
Most summer bulbs grown indoors require temperatures ranging from 4°C to 15°C. Even if you can only offer temperatures from 15°C to 21°C, you can still grow a wide selection of bulbs including Gloriosa lily, and the Amaryllis as well as any plants that are relatives. Most bulbs grown as houseplants need a rest period of at least a few weeks in winter. Water minimally, if at all, during this period.
Forcing Bulbs Indoors
A container of sunny Daffodils, or cheery Crocus, blooming on your windowsill in February, can be a treat. In order to enjoy these beautiful blooms in winter you must make plans in late fall. Depending on the type of bulb, it may take anywhere from 1 to 4 months from the time they are potted up until they bloom.
Potting up: Select a container that is twice as deep as the height of the bulbs. Shallow, heavy containers will not topple as readily as high containers. If you are planting your bulbs in potting mix, your pot must have drainage holes. Fill pot with mix (at least 2″ for root growth). When bulbs are placed on this layer, their tops should be even with the rim of the pot. Use several bulbs for an attractive display. Cover with potting mix and water in to settle.
Cooling/Rooting Period: Place pots in a cool (45°F, 7°C), dark place for 6 to 15 weeks, depending on the variety. Soil must be kept moist and should not be allowed to freeze during this time. A refrigerator, root cellar, or cool basement is ideal. Remove pots from cold storage when the appropriate time has passed or when white roots are showing through drainage holes or stems are 2″ high. Be careful if using a residential refrigerator. Ethylene, which is a gas produced by certain fruits and vegetables, can slow flower development in the bulb. Avoid storing the following fruits and vegetables anywhere near your bulbs. Passion fruit, apple, avocado, apricot, cantaloupe, kiwi, peach, banana, tomato, honeydew, cucumber, pepper, pineapple.
Forcing Blooms: Most types of bulbs will bloom 3 to 4 weeks after you bring your bulbs into a warm, bright room. Pots should be kept at 60°F/15°C with indirect sunlight for one week. Move pots to a warmer room (68°F/20°C), with direct sunlight until buds take on color. Return plants to indirect light and cooler temperatures to help blooms last longer. After blooming, hardy bulbs can be planted into your garden where they will bloom again in a year or two.
Easiest Bulbs for Forcing
- Large Flowered Crocus: Use at least 15 bulbs per container. They require a 12-15 week cold rooting period and can also be forced in water.
- Hyacinths: Hyacinths are often forced singly in glass forcing vases using only water. They can also be potted up in groups. Either way give them 4 to 8 weeks in a cool, dark place before forcing.
- Iris: Dwarf Iris are suitable for forcing, especially Iris reticulata. Place in cold treatment for 8-12 weeks. These species can handle very cold temperatures. When you take these out of cold treatment be sure to keep temperatures below 65°F or they may not bloom.
- Tulips: Tulips require a long (12-15 weeks), even cold treatment. Plant with flat side of bulb facing rim of pot for a more attractive display. Early, shorter varieties are the easiest to force.
- Daffodils: Plant in larger, deeper pots to accommodate long, heavy roots. Place in cold treatment for 12 to 16 weeks. Daffodils need very bright, direct sunlight to bloom properly.
- Scilla and Grape Hyacinths: Cool for 10-16 weeks. Use lots per pot.
Planting Shrubs
Bare Root Trees and Shrub roots need to be kept moist at all times.
Once your plants arrive open the bag it came in and immerse the whole plant in water for 24 hours before potting or planting. The roots will re-hydrate and enable new bud growth to develop successfully. Please refer to individual growing instructions for each type of plant.
Shrubs can be planted as soon as you can dig in your garden in early spring. You do not have to wait until frosts are over. These shrubs are hardy and can withstand cold temperatures. If you are unable to plant immediately, open the box to expose the stems but do not remove the wrapping around the roots, as this preserves moisture. Store the shrubs upright in a cool, humid, dimly lit location. Before planting, remove all packaging material, including the copper twist tie, then soak the entire plant, stems and roots, in a pail of water for several hours, but no more than 12 hours. At no time, should the roots ever be exposed to sun or wind, or be allowed to dry out. Trim off any broken roots or branches before planting.
Potted Shrubs & Vines
Water immediately and thoroughly upon arrival. Allow excess water to drain and store in a cool, dimly lit location. If you cannot plant within a day or two, these plants should be potted up into bigger containers, kept in a bright location and watered regularly. When planting out, gently remove the plant from the pot.
Leafed out, growing, non-dormant plants are sometimes shipped from our greenhouses in pots. These plants should be hardened off before planted outside if it is very cold in your area. Either gradually acclimatize the plant in a part sun location outdoors for a few days or if you choose to plant, it is recommended to cover with straw or an old blanket if a hard frost threatens.
Choosing the Site
Some shrubs and trees will require full sun that is at least six to eight hours a day, preferably afternoon sun. Please see individual listings for light requirements for each shrub, vine or tree. Choose an open site where breezes will blow through. This will aid in drying the foliage, preventing many fungal and viral diseases. Ideal spacing will enable trees and shrubs to grow more successful with less competition for water and nutrients. Take note of the mature size of your tree or shrub which will allow proper room to grow in height as well as width. Snow provides excellent insulation for even the most tender plant, so consider a spot where snow may gather naturally. The site should be well-drained. If water tends to puddle in the area, either choose a different site, or raise the bed by at least 5 cm (2 inches) by adding organic matter.
The Soil
Most shrubs and trees grow best in a rich, loamy soil with sufficient drainage. Loamy soil is basically a good combination of sand, clay, organic matter, and silt. To help soil keep rich, a yearly application of top dressing consisting of well-rotted manure or kitchen compost is advised. Most plants are adaptable to a neutral soil pH of 6.8-7.2, while some require slightly higher or lower levels which are noted in each individual listing.
Pre-Plant Pruning of Bare-Root Roses
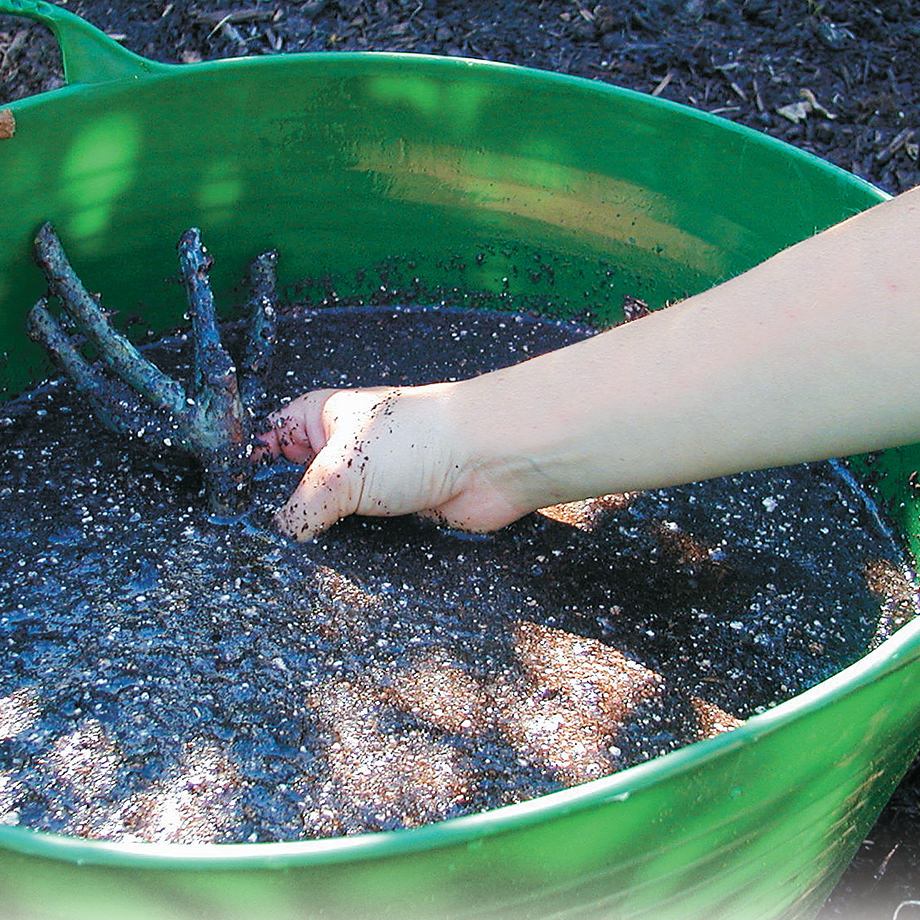
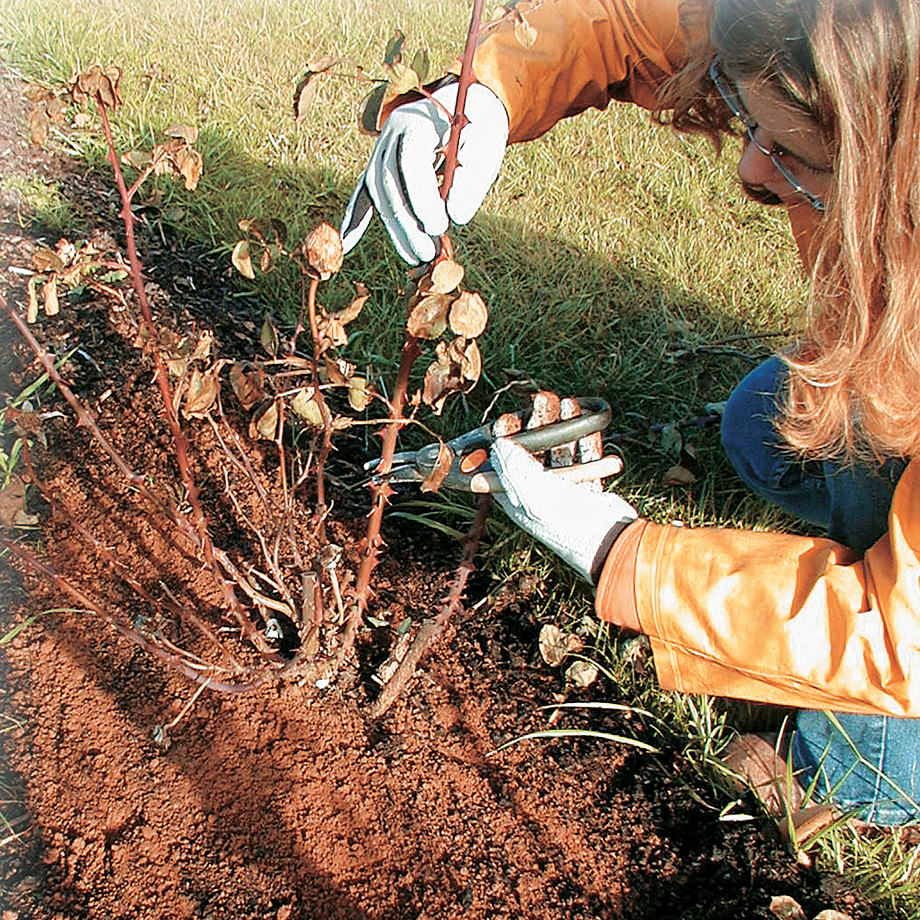
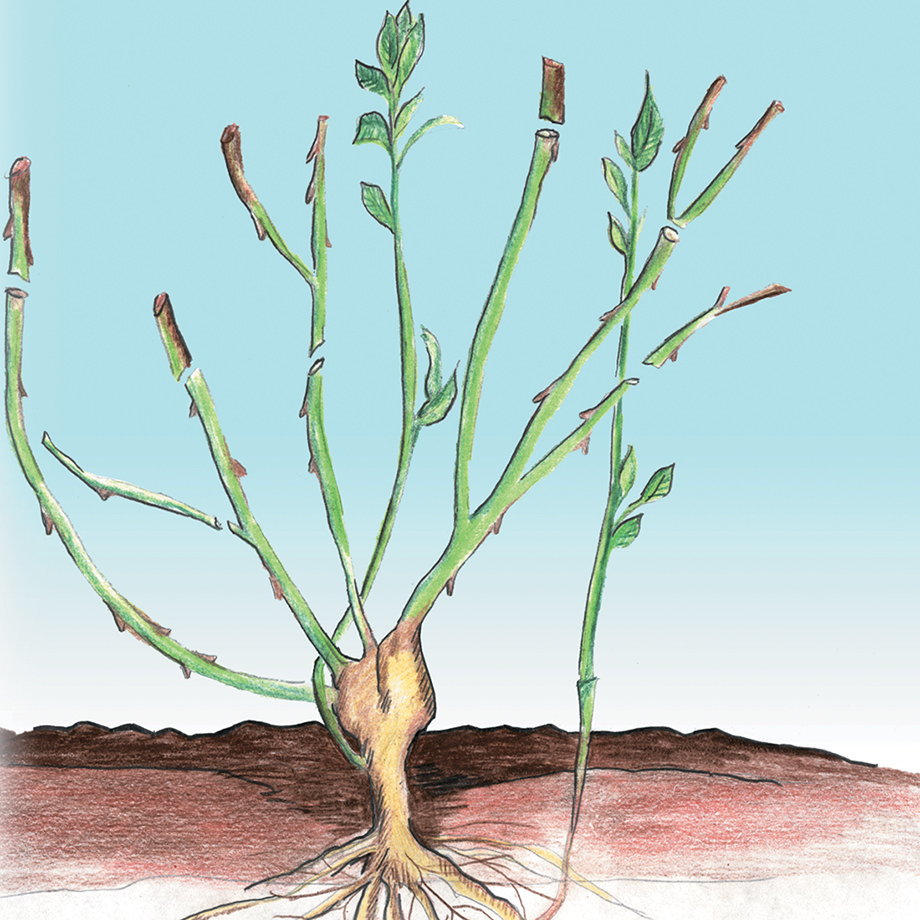
A hard pruning of bare root rose's helps to concentrate the roses energy on growing new shoots. First, prune all stems down to about 15-20cm (6-8 inches). The cuts should be made at an outward facing bud; the buds will appear as small bumps that unfurl into leaves (not the thorns!). Find a bud that is on the outside of the shrub, facing away from the center. This is where new growth will emerge, ensuring that your rose will grow outward leaving an open center. Cut just above the bud, on a slight diagonal. Now, look closely at the center of each stem, called the pith. It should be quite white or green. If it appears dark or yellow, continue pruning down to outward facing buds until white pith is reached. You may have one or more dead stems; do not worry, remove them and more energy will be put into the remaining stems. Now look for stems that may be rubbing against one another, the weaker of the two should be removed. Prune the root tips back to white tissue to encourage branching. You are now ready to soak the rose in muddy water for several hours, and then plant your new rose.
Pre-Plant Pruning of Bare-Root Shrubs
Before planting your shrubs, any broken or damaged branches can be removed. If two stems are rubbing together, remove the weaker one. Prune the root tips back to white tissue to encourage branching.
Planting
Dig a hole that is about 6 inches deeper and wider than the roots themselves, suited to the shape of the roots. Sometimes roots will be growing only in one direction, so dig an oval-shaped hole to suit. Dig a round hole if roots are spreading in all directions. Mix in some organic matter with the soil from the hole. A handful of bone meal will aid in root development. Lay a stick across the hole so you will know exactly where the surface level will be. Make a small mound of soil on which to sit the roots while ensuring they are spread out. Comb out the roots with your fingers to keep them from crossing. Place the shrub or tree so that the crown is about an inch below soil level. This is approximate, the general rule is that the harsher the climate, the deeper the crown should be planted.
Fill the hole about 2⁄3 full. Pack down soil with your feet, and water. After water has soaked in, fill hole and repeat packing and watering. This will ensure that there are no air pockets around the roots. Create a ‘catch-basin’ around the edge of the hole to catch water. Water again the following day with a water-soluble 10-52-10 fertilizer (the high middle number aids in root development), or water with manure or compost tea. You may want to mulch halfway up the stems for the first couple of weeks to prevent drying out. Water and fertilize this way once a week for the next three weeks.
Shrub Hedges
Any shrub or small tree can be used to make a hedge, but of course some are more suitable for this type of planting. Shrubs that are ideal are plants such as Spireas, Forsythias, Lilacs, Privets, Siberian Peashrub, Weigelas as well as Burning Bush to name some of the more commonly used varieties. Make your selection based on how tall you want the hedge to be, how fast you want it to grow as well as how you want it to look. Generally space plants one half to two thirds the mature plant width apart, depending on how fast you want the hedge to fill in. Following the remaining planting steps as mentioned for planting any tree or shrub once your desired spacing is established.
General Care of Trees and Shrubs
Watering
Most trees and shrubs benefit from receiving at least one inch of water per week during the first season. Once established, they are quite drought tolerant, but of course are more productive and healthier if watered during dry spells.
Weeding
We recommend that you keep the soil bare or mulched around your trees and shrubs. Turf grasses and weeds are heavy competitors for water, nutrients and even sunlight. These mulched borders (shrub/tree circles) also protect your new plants from grass-trimmer damage and will make it much easier to mow around them. These grass free areas are especially important during the first 2-3 years while the plant is becoming established. Organic mulches (shredded bark, bark nuggets, compost etc.) make weeding easier, retain moisture and look aesthetically pleasing.
Fertilizing
Ideally, most of the trees/shrubs ‘food’ should come from the soil. A yearly application of a top dressing of well-rotted manure or garden compost will keep the soil high in nutrients. Use a slow release fertilizer designed for trees and shrubs, or simply use an all-purpose, balanced water soluble fertilizer three times in the spring and early summer. For example- once in May, June and July. If using this type of fertilizer, it is best to wait a few weeks to allow trees and shrubs to establish their roots. You may also choose to fertilize more often with manure tea or fish emulsion. If conditions are dry when you want to fertilize, give a good, deep watering and fertilize the next day. Do not fertilize after about the first of August; the plants need this time without food to prepare for winter.
Pruning
Every time you make a cut it will affect the growth and over all health of your trees and shrubs. All cuts, regardless of their reason, should be made in the same manner. Cuts should always be made at an angle, just above an outward facing bud. This directs the growth of the plant away from the center which prevents crossed and crowded branches reducing the chances disease. Most trees and shrubs benefit from being pruned at least once a year. First of all, you should remove dead or dying, damaged branches, and the weaker of two stems that are rubbing against one another. This essential pruning can be done throughout the year, as damage occurs. Most spring flowering plants are pruned after they have flowered while late summer or fall flowering trees or shrubs are pruned in spring. This also applies for roses and vines. Please refer to individual pruning recommendations within our growing guide for each tree or shrub.
Fall Care
Ideally, all fallen leaves should be cleaned up that surround your trees especially shrubs. Destroy any diseased leaves in your waste to prevent over-wintering of fungal and viral diseases. Water heavily a few weeks before the ground freezes up, unless it has been a very wet fall. This can be done anywhere before October to December depending on where you live.
Common reasons why trees and shrubs may fail to survive after planting
- Stems Dehydrating: Hot weather at planting time can dry out stems before they get a chance to break buds. Prior to planting a new tree or shrub it is best to soak the roots for a minimum of an hour with a maximum time of 12 hours as stated previously. This will ensure the plant has a healthy root and ready to become established.
- Loose Planting: Tug on a stem after you plant. If the plant shifts, tread carefully around the baseline of the tree to eliminate air pockets. Water in well.
- Storage: Improper, prolonged storage before planting.
- Waterlogged Soil: Good soil drainage is essential.
- Severe drought: Usually only occurs during the first growing season. Water regularly and deeply.
- Use of fresh manure or chemical fertilizer at planting time: Use only aged manure, peat moss, compost, worm castings, or bone meal at planting time. Do not add additional fertilizer to newly planted trees until a few weeks after planting if needed.
- Dry roots at planting time: Soak roots for several hours before planting. Never let them dry out!
- Too much lime in the soil: It is recommended to have a soil analysis if this is possible.
- Planting under fully mature trees: Combined effects of root dryness and dense shade.
- Failing to prune before planting: Each new plant can benefit from some light pruning as well as root pruning to encourage new growth both with stems and roots.
- Weed competition: Maintain a bare, or preferably mulched, area around the plants at least for the first 2-3 years.
- Mechanical Damage: Grass cutters, lawn mowers, bikes, dogs, etc. can cause severe damage to new plants. Clearly mark them or protect them with fencing if necessary.


