Radish Organic Sprouts
A dual purpose radish, can be grown as a green or as sprouts. Slightly spicy. If you like radishes you're going to love radish sprouts. Sprouts are great for salads and stir-fries. Growing your own sprouts is a great way to get your gardening fix throughout the cold days of winter. Easy to grow in a mason jar or our handy sprouter. Approx. 75 seeds/gram.
View Common Uses for Sprouts and Sprouts Recipes online here.
Scroll down for more details and growing information.

Details
Growing Information
Directions:
Distribute evenly a very thin layer of seed. The seeds will swell and require a lot of space. For proper germination, seeds should remain wet, but never submerged. Sprouting kits are designed to keep seeds moist, while draining away excess water. Rinse seeds two or four times each day for best results.
Sprouting in the dark will force the sprouts to elongate, while sprouting with exposure to light will have the added benefit of allowing the tiny plants to produce chlorophyll, turning them green for an added nutritional value.
Please Note: The tiny seedlings develop very fine, fuzzy root hairs that can sometimes be mistaken for mould. If you think you are growing mould, look closely at one of the seedlings to determine if it is simply the fuzzy root hairs that you are seeing.
Using a Sprouter:
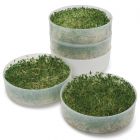
Place desired seed in the topmost tiers leaving the bottom tier, the one that the others sit on, empty. The bottom tier is left empty for excess water collection. Remember, 1 tablespoon of small seed or two tablespoons of large seed is all that is needed.
Rinse seeds two to four times per day. Fill the top tier and allow water to seep through the layers and collect in the bottom tier. Dump excess water.
Place the cover of the sprouter on the topmost tier. Never seal with cover as some airflow is needed. Sealing with the cover increases the chance of mould.
Repeat steps 2 and 3 until desired sprout size is achieved. Different crops require different days to harvest but 2-7 days is the typical range.
Note: Wash entire sprouter between harvests. This decreases the chance of mould developing.
Growing Microgreens:
Sow seeds in a shallow tray of potting mix and cover lightly. About 8 to 9 grams of seed should be enough for an 11 inch x 21 inch tray. Keep the soil moist but not wet. Seedlings should be grown in full light to keep them from stretching.
Harvest:
Once seedlings have 1 –2 true leaves they are ready for harvest. This can range from 10-20 days depending on the growing conditions and the type of micro green. To harvest cut the seedlings off just above ground level with a sharp knife or scissors. The plants will not regrow, so discard the left over soil and start a new batch.
Pests:
Damping off can be a problem with microgreens. Be sure and use fresh potting mix with each batch, do not over water and allow air to circulate around the seedlings.


